
Have you ever wondered how to add text over images in WordPress? Whether you want to highlight important information or create visually appealing content, adding text over images can be a powerful tool in your website design arsenal.
WordPress is a popular content management system that allows users to easily create and customize websites. While adding images to your WordPress site is a straightforward process, adding text over those images can be a bit trickier for beginners.
In this article, we will walk you through the steps to add text over images in WordPress. We will cover various methods, from using plugins to manually adding code, so you can choose the approach that works best for you. By the end, you’ll have the knowledge and skills to enhance your website with eye-catching text overlays on your images.
How to add Text Over Images in WordPress
Adding text over images in WordPress can be a great way to draw attention to important information or visually enhance your website design. Fortunately, WordPress makes it easy to add text overlays with several different methods.
The first method is to use a plugin such as Image Inject or Image Caption Hover Effects. These plugins are quick and easy solutions for adding text overlays on images in WordPress .
Alternatively, you can manually add text overlays to images by adding custom CSS code to your WordPress site. This method is a bit more technical and requires some coding knowledge, but it can be useful for adding text overlays with more complex designs.
What is Text Over Images?
Text over images is a popular technique used in web design and content creation to add context, information, or visual appeal to an image. It involves placing text directly over an image, creating a combination of both visual and textual elements. This technique is widely used in various industries, including blogging, marketing, e-commerce, and storytelling.
Text over images can serve multiple purposes. It can be used to provide captions, descriptions, or titles for images, helping viewers understand the content or context of the image. This is particularly useful in cases where the image may not be self-explanatory or requires additional information to be conveyed effectively.
Moreover, text over images can be used to create visually engaging graphics or promotional materials. By strategically placing text over an image, you can create eye-catching banners, posters, or social media graphics that grab the attention of your audience.
In addition, text over images can play a crucial role in website design. It can be used to create unique headers, hero images, or background images that complement the overall look and feel of a website. By incorporating text directly into the visual elements of a website, you can enhance the visual appeal and make the content more memorable and engaging.
Text over images can be added to your WordPress website using various methods, depending on your needs and preferences. Many WordPress themes and page builders offer built-in features to easily add text over images. Additionally, there are numerous plugins and custom coding options available to help you achieve the desired effect.
In conclusion, text over images is a powerful technique to enhance the impact and visual appeal of your website or content. Whether you want to provide additional context, create visual graphics, or improve the overall design, incorporating text over images can help you achieve your goals effectively. With the abundance of options and tools available in WordPress, adding text over images has never been easier.
Why Use Text Over Images in WordPress?
Using text over images in WordPress can greatly enhance the visual appeal and functionality of your website. There are several reasons why incorporating text over images is a valuable strategy:
1. Improved User Experience: Text over images can provide valuable context and information to viewers, enhancing their understanding and engagement with the content. By adding captions, descriptions, or titles to images, you can help users grasp the purpose and significance of the visual elements.
2. Visual Engagement: Strategically placing text over images can create visually compelling graphics and promotional materials. By combining images and text, you can create eye-catching banners, posters, or social media graphics that grab the attention of your audience. This can significantly increase your website’s visual appeal and make your content more memorable.
3. Website Design Enhancement: Text over images can play a crucial role in website design. It can be used to create unique headers, hero images, or background images that complement the overall look and feel of a website. By incorporating text directly into the visual elements of a website, you can enhance the aesthetics and create a cohesive and visually appealing design.
4. Customization Options: WordPress offers a wide range of customization options for adding text over images. Many WordPress themes and page builders provide built-in features that make it easy to add text over images without the need for coding. Additionally, there are numerous plugins available that offer advanced options and functionalities for text overlays on images.
5. Promotional Opportunities: Text over images can be a powerful tool for promoting products, services, or events. By adding promotional text directly onto images, you can create visually appealing advertisements that effectively convey your message. This can be particularly useful for e-commerce websites or businesses looking to highlight their offerings.
In conclusion, using text over images in WordPress can enhance user experience, improve visual engagement, enhance website design, provide customization options, and open up promotional opportunities. Whether you’re adding captions to images or creating visually captivating graphics, incorporating text over images can greatly benefit your WordPress website.
Using the Classic Editor
Using the Classic Editor in WordPress provides users with a familiar and straightforward way to add text over images. While the block editor may offer more advanced features and flexibility, the Classic Editor remains a popular choice for those who prefer a simpler editing experience.
One advantage of the Classic Editor is its ease of use. It offers a familiar interface that resembles traditional word processing software, making it easier for users to navigate and format their content. Adding text over images in the Classic Editor is as simple as inserting the image, selecting it, and then typing directly onto the image itself.
Another benefit of using the Classic Editor is its compatibility with a wide range of plugins and themes. Many plugins and themes are designed specifically for the Classic Editor, offering additional functionalities and customization options. This allows users to further enhance their ability to add text over images and create visually appealing content.
Furthermore, the Classic Editor also provides users with the flexibility to control the positioning and style of the text over images. Users can easily adjust the size, color, font, and alignment of the text to suit their preferences and match the overall design of their website. This level of customization helps ensure a consistent and visually pleasing layout across all pages and posts.
While the Classic Editor may lack some of the advanced features found in the block editor, its simplicity and compatibility make it a valuable tool for adding text over images in WordPress. Whether you are a beginner or prefer a more straightforward editing experience, the Classic Editor remains a reliable option for enhancing your content and engaging your audience.
Adding a Background Image to the Post or Page
Adding a background image to a post or page can significantly enhance its visual appeal and captivate your audience. With WordPress, it’s easy to create a stunning backdrop for your content.
To add a background image, you can take advantage of the Block Editor’s powerful features. With the Block Editor, you have more control over the design and layout of your posts and pages. Here’s how you can add a background image using the Block Editor:
1. Open the Block Editor and create a new post or page, or edit an existing one.
2. Select the block that you want to add the background image to. This could be a Paragraph block, a Cover block, or even a Group block.
3. Click on the block’s settings icon (usually represented by three dots) to access the block settings.
4. In the settings panel, look for the Background Image option. This may be located under the Style or Design tab, depending on the block you are using.
5. Click on the Background Image option, and a menu will appear prompting you to either upload an image from your computer or select an image from your media library.
6. Choose the image you want to use as the background image and click on the “Insert” button.
7. Once the image is added, you can adjust its position, size, and other attributes using the block’s settings. Some blocks may offer additional customization options like opacity or blur effects.
8. Save your changes, and you’ll have a stunning background image for your post or page.
Adding a background image can help set the mood and tell a story, whether you’re showcasing a product, sharing a personal experience, or promoting an event. It’s an effective way to make your content visually appealing and keep your readers engaged.
In addition to the Block Editor, you can also explore the vast array of plugins available in the WordPress ecosystem. Many plugins offer advanced options for adding background images, such as parallax effects, image sliders, and even video backgrounds. These plugins can take your website to the next level and provide a unique and immersive user experience.
Remember, when adding a background image, it’s crucial to choose an image that complements your content and doesn’t distract or overwhelm. Opt for high-quality images that align with your brand or message. Additionally, make sure to optimize the image for web to maintain fast loading speeds.
With WordPress and its extensive customization options, you can effortlessly add a background image to your posts or pages and make a lasting impression on your readers. So why wait? Start experimenting with background images today and create visually stunning content that stands out from the crowd.
Inserting Text Over the Image with HTML and CSS
Inserting text over an image can be a powerful design technique that can enhance the visual appeal and impact of your website. With HTML and CSS, you can easily achieve this effect and create stunning overlays on your images. Here’s how you can insert text over an image using HTML and CSS:
1. Start by adding an HTML container to hold both the image and the text. You can use a
element with a unique ID or class name to target it in CSS.
2. Next, add the image inside the container using the element and specify the source file using the “src” attribute. Make sure to provide the appropriate alt text for accessibility purposes.
3. Now, to overlay text on top of the image, you’ll need to position it using CSS. Inside your CSS file or inline styles, target the container element using the ID or class name.
4. Set the container’s position property to “relative” to establish it as the reference point for absolute positioning.
5. Add the text overlay by creating another
element inside the container. You can use a class name or ID to target this specific element in CSS.
6. Style the text overlay by targeting its class or ID in CSS. Set the position property to “absolute” to position it relative to the container.
7. Use the “top”, “bottom”, “left”, and “right” properties to adjust the text’s position within the container. You can also use properties like “padding” and “margin” to fine-tune the position and spacing.
8. Customize the text’s appearance by setting properties like “color”, “font-size”, “font-family”, and “text-align” in CSS.
9. To make the text more legible, you can add a background color or opacity to the text overlay. Set the appropriate values for properties like “background-color” or “background-opacity”.
10. Save your changes, refresh the page, and you will see the text overlaying the image.
Remember, when inserting text over an image, it’s important to consider the readability and contrast of the text. Choose a font color and size that stand out from the background, ensuring that the text is easy to read. You can experiment with different styles and effects to create an eye-catching design that complements your website’s aesthetic.
By using HTML and CSS, you have the freedom to be creative and add personalized text overlays to your images. Whether you want to display captions, titles, or quotes, this technique will allow you to elevate the visual impact of your website and captivate your visitors.
Adding a short code
Here’s a simple example of how you can achieve this using a custom shortcode in your theme’s functions.php file:
- Open your theme’s
functions.phpfile (usually found in thewp-content/themes/your-theme-name/directory). - Add the following code to create a shortcode:
function text_over_image_shortcode($atts, $content = null) {
$atts = shortcode_atts(
array(
‘image’ => ”,
‘text’ => ”,
),
$atts
);$output = ‘<div>’;
$output .= ‘<img src=”‘ . esc_url($atts[‘image’]) . ‘” alt=”Image”>’;
$output .= ‘<div>’ . esc_html($atts[‘text’]) . ‘</div>’;
$output .= ‘</div>’;return $output;
}
add_shortcode(‘text_over_image’, ‘text_over_image_shortcode’);
3. Add the following CSS to your theme’s stylesheet (usually style.css):
.text-over-image {
position: relative;
display: inline-block;
}.text-over-image img {
max-width: 100%;
height: auto;
}.text-over-image .overlay {
position: absolute;
top: 0;
left: 0;
width: 100%;
height: 100%;
background-color: rgba(0, 0, 0, 0.5);
color: #fff;
padding: 20px;
box-sizing: border-box;
opacity: 0;
transition: opacity 0.3s;
}.text-over-image:hover .overlay {
opacity: 1;
}
Now, you can use the shortcode in your posts or pages like this:
[text_over_image image=”image-url.jpg” text=”Discover our amazing products!”]
Replace "image-url.jpg" with the actual URL of the image you want to use and customize the text as needed.
Remember to replace "your-theme-name" with your actual theme’s folder name.
This code will create a box with an image and an overlay that appears when the user hovers over it, displaying the provided text. You can further customize the styles and layout according to your preferences.
Adjusting the Size of the Background Image
When it comes to creating visually stunning websites, the background image plays a crucial role in setting the overall tone and impression. However, sometimes the default size of the background image may not fit perfectly with your website’s layout. That’s where adjusting the size of the background image comes into play.
In WordPress, there are several ways to modify the size of your background image to ensure that it fits seamlessly with your website’s design. Let’s take a closer look at how you can accomplish this:
1. Using CSS:
One of the simplest ways to adjust the size of a background image is by applying CSS properties. You can do this by accessing your WordPress theme’s stylesheet or by utilizing a dedicated CSS plugin. Start by targeting the element that you want to set the background image for, and then use the `background-size` property to adjust its size. You can choose from various values such as “cover” (expands the image to cover the entire element) or “contain” (scales the image to fit within the element while maintaining its aspect ratio). Additionally, you can specify specific dimensions using pixels or percentages for more precise control.
2. Using WordPress Customizer:
If you prefer a more user-friendly approach, you can leverage the WordPress Customizer to adjust the size of your background image. Simply navigate to “Appearance” in the WordPress dashboard and click on “Customize.” From there, locate the “Background Image” option and select the “Adjustment” tab. Here, you will find options to adjust the background image’s size, position, and repeat. Utilize the provided controls or input your preferred values to resize the background image according to your specific requirements.
3. Using a Plugin:
Another convenient way to adjust the size of your background image is by utilizing a WordPress plugin. There are numerous plugins available that offer advanced customization options for background images. These plugins often come with intuitive interfaces, allowing you to modify the image size without delving into code. Look for plugins that offer features like scaling, cropping, and resizing images, as well as options for optimizing image quality and file size.
By adjusting the size of the background image, you can ensure that it fits perfectly within your website’s layout. Whether you choose to use CSS, the WordPress Customizer, or a dedicated plugin, having control over the image size allows you to create a more visually appealing and professional-looking website. Take the time to experiment with different settings until you achieve the desired result, and remember to consider factors like responsiveness and overall aesthetics when resizing your background image in WordPress.
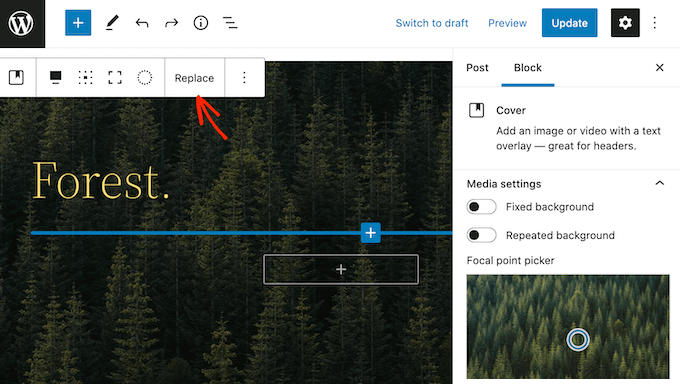
Using the Block Editor
The Block Editor, also known as Gutenberg, is a powerful tool in WordPress that allows users to create and edit content using blocks. This innovative editor has revolutionized the way we design and manage our websites. One of the many amazing features of the Block Editor is the ability to add text over images, giving your visual content an extra layer of depth and sophistication.
To add text over an image using the Block Editor, simply follow these easy steps:
1. Insert an Image Block: Start by selecting the “+” icon to add a new block and search for the “Image” block. Click on it to insert an image block into your post or page.
2. Upload or Select an Image: Once the image block is added, you have the option to either upload a new image or select one from your media library. Choose an image that complements the message you want to convey or the overall theme of your content.
3. Adjust Image Size and Alignment: Customize the appearance of the image by adjusting its size and alignment. The Block Editor provides intuitive controls to resize, crop, or rotate the image as needed. You can also specify the alignment of the image within the available block layout options.
4. Add Text Block: After inserting and customizing the image, it’s time to add the accompanying text. Select the “+” icon again to add a new block, but this time search for the “Paragraph” block or any other suitable block for text. Click on it to insert the block below the image.
5. Enter Text Content: With the text block added, you can now enter the desired text content. Writing compelling and informative text that complements the image will help engage your audience and convey your message effectively.
6. Customize Text Styling: The Block Editor offers various text formatting options to customize the appearance of your text. You can change the font size, color, alignment, and more. Experiment with different combinations to find the style that best enhances your image.
7. Adjust Text Positioning: To position the text over the image, use the Block Editor’s block alignment options. These options allow you to shift the text block to the left, center, or right of the image. You can also experiment with different block layouts to achieve the desired visual effect.
8. Preview and Publish: Before publishing your post or page, make sure to preview it to ensure that the text and image are perfectly aligned and visually appealing. Once satisfied, hit the publish button to make your content live on your website.
By utilizing the Block Editor’s features, you can easily add text over images in WordPress, creating visually stunning and engaging content. Whether you want to highlight a key message, provide context to an image, or simply enhance the visual appeal of your website, using the Block Editor is a game-changer. So why wait? Start exploring this powerful tool today and take your content creation to the next level.
Installing a Plugin for Image Blocks with Text Overlays
If you’re looking to enhance your website’s visual appeal with text overlays on images, installing a plugin specifically designed for image blocks can provide you with the necessary tools and features. These plugins offer an abundance of image settings and customization options, allowing you to create stunning visuals that capture your audience’s attention.
To begin the process of installing a plugin for image blocks with text overlays, follow these simple steps:
1. Choose a Plugin: Start by researching and selecting a suitable plugin for your needs. Look for plugins with positive reviews, high ratings, and a good track record of regular updates and support. Consider plugins like “Image Block with Text Overlay” or “Text Over Image Block” which provide the necessary functionality for adding text overlays to your images.
2. Install the Plugin: Once you have chosen the desired plugin, log in to your WordPress dashboard. Navigate to the “Plugins” section and click on “Add New.” In the search bar, enter the name of the plugin you selected. When the plugin appears, click on the “Install Now” button, and WordPress will automatically install it for you.
3. Activate the Plugin: After the installation process is complete, click on the “Activate” button to activate the plugin. Once activated, the plugin’s features and settings will become available.
4. Set up the Plugin: Depending on the plugin you choose, there may be specific settings or configurations that you need to adjust. Look for options related to text styling, overlay colors, positioning, and any other customizations you want to make. Take the time to explore and familiarize yourself with the plugin’s features and settings.
5. Add Image Blocks with Text Overlays: With the plugin installed and configured, you can now start adding image blocks with text overlays to your posts or pages. Open the editor for the desired post or page and add a new block. Search for the plugin’s block, usually labeled as “Image Block with Text” or something similar, and insert it into your content.
6. Customize Text and Image: Once the image block with text overlay is inserted, you can customize both the text and the image. Enter the desired text content and apply any necessary formatting or styling using the options provided by the plugin. You can also upload or select an image from your media library and adjust its size, alignment, and other visual properties within the plugin’s block settings.
7. Preview and Publish: After customizing the image block with text overlay, preview your post or page to ensure that the text and image align perfectly and create a visually appealing effect. Make any necessary adjustments if needed. Once satisfied, hit the publish button to make your content live on your website.
By installing and utilizing a plugin specifically designed for image blocks with text overlays, you can elevate your website’s visuals and create engaging content that leaves a lasting impression on your audience. Experiment with different plugins and their settings to find the perfect combination that matches your website’s unique style and aesthetic.
Choosing a Gallery Type for Text Overlays
When it comes to adding text overlays to images in WordPress, one popular approach is to use a gallery type that supports this functionality. With a variety of gallery plugins and options available, choosing the right gallery type can enhance the visual appeal of your website and make your text overlays stand out. Here are some factors to consider when selecting a gallery type for text overlays:
1. Grid Types: Look for a gallery plugin that offers different grid types. Grid layouts can be an excellent choice for displaying multiple images with text overlays in a clean and organized manner. Consider options like masonry grid, justified grid, or even a customizable grid that allows you to adjust the size, spacing, and arrangement of images and text.
2. Overlay Options: Check if the gallery type provides customizable overlay options. This feature allows you to control the appearance of the text overlays, including the font, size, color, opacity, and position. Having flexibility in overlay options enables you to create visually appealing designs that complement your website’s overall aesthetic.
3. Image Sizes: Consider a gallery type that supports various image sizes. Depending on your website’s design, you may need to display images of different dimensions. Having the flexibility to adjust image sizes within the gallery type ensures that your text overlays are appropriately proportioned and visually appealing across different devices and screen sizes.
4. Gallery Settings: Look for a gallery type that offers a range of settings to customize the entire gallery’s appearance. This can include options for the background color, the spacing between images and text, the navigation style, and more. These settings enable you to create a cohesive look and feel for your gallery with text overlays that align with your brand’s style.
5. Compatibility with Text Editors: Ensure that the gallery type you choose is compatible with your preferred text editor. Whether you use the classic editor or the block editor, make sure the gallery plugin seamlessly integrates with the editor interface and provides a user-friendly experience for adding and editing text overlays.
6. Responsive Design: Opt for a gallery type that is designed to be responsive. With more users accessing websites through mobile devices, it is crucial that your text overlays and gallery images adapt to different screen sizes. A responsive gallery type will automatically adjust the layout and size of the images and text overlays, ensuring a consistent and visually pleasing experience for your visitors.
Remember, when choosing a gallery type for text overlays, consider the overall design and style of your website. It’s essential to select a gallery type that not only supports text overlays but also complements the rest of your content and enhances the user experience. By carefully evaluating the grid types, overlay options, image sizes, gallery settings, compatibility with text editors, and responsive design, you can confidently choose the best gallery type for your WordPress website.
Customizing Settings for Each Block in the Gallery Type
When it comes to creating visually stunning galleries with text overlays, one important aspect to consider is the ability to customize settings for each block within the gallery type. This level of customization allows you to have complete control over the appearance and behavior of individual blocks, ensuring that each image and text overlay is displayed exactly as you envision.
By customizing settings for each block, you can create a unique and captivating gallery experience for your website visitors. Here are some key factors to consider when customizing settings for each block in the gallery type:
1. Block Positioning: With the ability to customize settings for each block, you can easily determine the placement of each image and accompanying text overlay. Whether you want them to be positioned side by side, stacked vertically, or in a specific arrangement, this level of control ensures that your gallery maintains a visually appealing layout.
2. Background and Overlay Effects: Customizing settings for each block also allows you to apply different background and overlay effects to individual images and text overlays. This means you can experiment with various color schemes, gradients, patterns, or even add transparency effects to create a unique visual impact for each block.
3. Typography and Font Customization: Personalizing the typography and font styles for your text overlays can significantly enhance the overall aesthetic of your gallery. With the ability to customize settings for each block, you can choose from a wide range of fonts, font sizes, line spacing, and even apply text effects such as shadows or highlights to make your text stand out.
4. Animation and Transition Effects: Adding animation and transition effects can add an extra layer of dynamism to your gallery. By customizing settings for each block, you can choose from a variety of animation styles, such as fades, slides, or zoom-ins, to bring your gallery to life and grab your visitors’ attention as they navigate through the images.
5. Hover and Interaction Effects: Customizing settings for each block also allows you to define the hover and interaction effects for your gallery. You can choose to display additional information or a pop-up caption when users hover over a specific image or text overlay. This adds an interactive element to your gallery, providing users with more context and engagement.
To customize settings for each block in the gallery type, look for a plugin or tool that offers a user-friendly interface with intuitive controls. This will enable you to easily modify and experiment with different settings until you achieve the desired look and feel for each block.
In conclusion, customizing settings for each block in the gallery type empowers you to create a visually captivating and engaging gallery experience. By controlling the positioning, background and overlay effects, typography, animation and transition effects, as well as hover and interaction effects, you can tailor each block to match your website’s style and capture the attention of your audience. So, take advantage of this customization feature and unleash your creativity to create stunning galleries with text overlays that leave a lasting impression.