
How to create a store with WooCommerce can be easier than you think. You don’t need a developer or web designer to get started. If you already have a website, this process is even easier. But regardless of whether you are starting from scratch or using an existing site, you will need to decide how to best use the features of both websites. This is where you’ll learn how to create a store with WooCommerce.
One of the first steps to take when learning how to use Wookecommerce is deciding what kind of store you’d like. Would you like to open up a physical store and sell products? Would you prefer to use a shopping cart or multi-pricing feature? If you’re looking for a physical location to open your store, checkout processors will come in handy. As for payment options, you can use PayPal, Google Checkout, or direct payments from your bank.
The next step is deciding what features you’d like to have in your store. The checkout process is perhaps the most important part of the shopping experience, so that’s the place we’ll start off with. You’ll need a secure checkout mechanism to protect against SPAM. You’ll also need to select your products, add them to your cart, and enter shipping and billing information.
Add your products to the store. Your page should tell your customers where to find what they want. If you use a product catalog service, this should be easily integrated into the site. If you use a theme system, it’s probably a good idea to download one so that your pages look like standard WordPress themes. In the short run, this feature may not seem all that important, but in the long run you’ll find that your store offers a more professional and polished look.
You’ll next need to decide on your store layout. This is the first step of adding your add-ons and themes to your website. You can use the WordPress grid system, which is built-in to the blogging platform. Or you can use the Easy Store Builder which provides a pre-designed store template, as well as drag and drop functionality to arrange items in the store.
Once you’ve organized your store, you can move on to the final step of adding your add-ons. The add-on section of your website contains a list of all available add-ons for sale. There’s a default list for most platforms, but you can add your own by installing the corresponding code. Be sure to check the “WooCommerce-compatible add-ons” option in your cPanel.
The last step is simply to activate the add-on and customize it using the various options provided. Most people will opt to use only one or two add-ons, but if you have several store features such as product reviews and inventory you may want to use the add-on library feature to build several additional store features. When you’re finished, you simply activate the add-on again and the feature should be live in your website! How easy is that?
Store development has never been so easy and simple with add-ons like WooCommerce. Add-ons make your site’s operation simpler, whether you want to add a new product line or enhance an existing product line. Shopify developers make it their business to ensure that their customers can use all the tools they need to operate smoothly, whether it’s building a new store or updating an existing one. If you need help with add-ons, contact the Web designers at Web shops around the world that provide WordPress support.
What is WooCommerce?
WooCommerce is a free eCommerce software that makes it easy for selling products and services online. Over the years, it has become the most popular eCommerce platform in the world used by millions of small and large businesses (online stores).
WooCommerce is developed as an extension of WordPress which is the most popular website builder on the market. This allows users to build an eCommerce website from scratch or add shopping cart functionality to an existing website.
As an open-source software, WooCommerce is free to download and use. However, while the WooCommerce software is free, you still need a domain name and web hosting service to setup a website, which costs money. We will talk more about WooCommerce pricing later in this article.
WooCommerce has become the most popular eCommerce software in the world because it’s easy to use for beginners, and it comes with extremely powerful features.
Since WooCommerce is open source , not only is it 100% free, you also get complete freedom and control over your eCommerce website.
Unlike other proprietary eCommerce platforms, WooCommerce pricing does not include licensing fees. This means you can use it to create as many online stores and eCommerce websites as you like.
WooCommerce is plugin built on top of WordPress, which means you get to benefit from all the powerful features of WordPress as well. See our complete WordPress review to learn more about WordPress.
There are thousands of beautiful WooCommerce designs and templates that you can choose from to start your online store. Each of them comes with easy to use customization options and many of them are available for free.
One of the main reasons why business owners love WooCommerce is it’s flexibility. You can add additional features to WooCommerce by using various WooCommerce plugins (also known as add-ons). There are literally thousands of WooCommerce specific plugins that you can use to extend its functionality to add features like booking, subscriptions, shipping platform integrations, sales tax collection, etc.
Apart from addons made specifically for WooCommerce, you can also use thousands of WordPress plugins on your website to add features like contact forms, call now buttons, galleries, data backup, security firewall, etc.
Another advantage of using WooCommerce is that it puts no restrictions on how you run your business.
You can add unlimited products, make unlimited sales, import and export product data, add unlimited product images, videos, categories, and more.
Accepting payments online is a major hurdle for many users. For those users, the most important benefit of using WooCommerce is that it integrates seamlessly with dozens of payment services and gateways.
By default, it supports PayPal and Stripe out of the box. You can use dozens of other payment gateways through add-ons. There are even integrations available for some lesser-known and regional payment gateways.
Want to see how WooCommerce compares against other popular eCommerce platforms? See the following comparisons to check out how it stacks up against the competition.
WooCommerce vs BigCommerce WooCommerce vs Magento
That being said, now let’s take a look at what do you need to make a WooCommerce powered online store.
What Do You Need to Make a WooCommerce Store?
A question we all get asked often is “what do you need to make a WooCommerce store?” We all know it’s free and easy, but it still baffles many of us, so let’s discuss it a bit. First of all, to use any commerce system, whether or not it’s free, you need to have an online merchant account. If you don’t have one, don’t worry, as we’ll go into how to create your very own merchant account in the following step by step guide.
One of the most frequently asked questions regarding getting started with a new ecommerce solution is “what do you need to make a store?” As with any solution, there are a few prerequisites you’ll need to fulfill before you can officially open up a store. For instance, you’ll need to sign up for a valid merchant account from a reputable provider like PayPal or WorldPay.
Another frequently asked question regarding setting up a new ecommerce store is “What do you need to do to optimize it for Google and other search engines?” The most important thing for any store is to get started with a good theme, so this is probably the single most important step. Your theme will be what makes up the front page of your site, so it’s critical that you pick the right one at the outset. Also important is getting the right set of sitemaps and error pages in place, as well as setting up an online store template. These two things are very important and should be given extra thought, as your store’s layout is one of the main reasons people will visit in the first place. Once you’ve got these ready, you’re ready to actually start building your store.
The next step you’ll need to take in order to start making money online from your new store is to pick an ideal product to sell. This step usually involves some research, as many products have different benefits and drawbacks. You’ll need to research these and pick a product that has enough demand to make it profitable. Once you’ve found a profitable niche, you can move onto setting up SEO and building a website for your new online shop.
There are several ways to boost your store’s SEO performance, including using meta tags, writing optimized content, adding new keywords and generating HTML links. It is also important to submit your site to all of the major search engines, as well as some lesser known ones. Most SEO experts recommend the use of article marketing, as this is one of the fastest and cheapest ways to use SEO effectively. You can also use video marketing and press releases to add new content to your site. If you want to learn more about SEO, there are several e-books and websites out there with step by step guides on how to optimize your website for search engines.
Once you have created your site, you will be able to start selling your merchandise. When a customer clicks on one of your store’s products, you will be asked to redirect them to your sales page. At this point, you will be responsible for handling any credit card payments for your customers, as well as processing their orders and making sure everything is correct. Most stores will charge a one time fee for opening a shop, as well as monthly maintenance fees. It is important to know what your responsibilities will be when you start a WooCommerce store, as this is important to make sure you are making profit from your new online business venture.
You will need the following three items to make a WooCommerce website from scratch.
- A WordPress hosting account. This is where all your website files will be stored.
- A domain name . This is your website’s address on the internet e.g. wpbeginner.com A SSL Certificate to securely accept online payments The above items are not free and cost money. Often beginners ask, if WooCommerce is free, then why do I need to pay for these things.
Well, you need to pay for these three things to build any type of website (not just WooCommerce).
The overall cost of your online store (WooCommerce pricing) will depend on which services you choose to purchase for your website. You can easily control the costs by only purchasing what you actually need.
Remember, you can add other things later as your business starts making money.
Normally, web hosting would cost you $7.99 / month for a starter site, domain name $14.99 per year, and an SSL certificate around $69.99 per year.
Now, this is a significant investment and every penny counts when you are starting a new business.
Bluehost is one of the biggest hosting companies in the world. They host millions of websites on the internet along many of our own.
Now that we have covered the basic WooCommerce requirements, let’s see how to set up WooCommerce with step by step instructions.
Step 1. Getting Started with WooCommerce
First, you need to visit the Bluehost website and click on the Get started now button.
Next, you will be asked to select a plan for your hosting account. Basic and Plus plans are popular among many users, and remember you can always upgrade to get more resources later when you need it.

Click to select a plan and continue.
After that, you will be asked to register a new domain name or use an existing domain name that you already own.
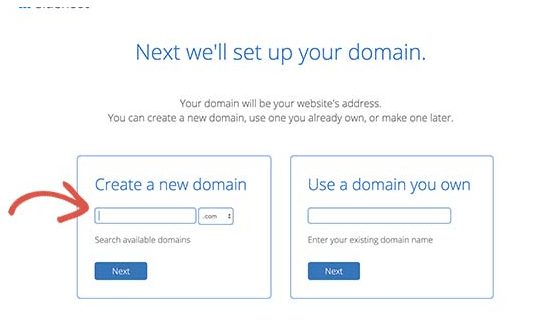
Here are some quick tips on choosing the perfect domain name for your WooCommerce store.
- Use keywords in your domain name. For example, if you want to sell gardening supplies then use it in your domain name as keyword.
- Use your brand name in your domain name
- Stick to .com extension
- Do not use numbers or hyphens in your domain name. This makes them hard to pronounce and spell
For more tips, see our guide on how to choose the perfect domain name for your business. You can even use a domain name generator to help.
It is important to spend time on choosing the right domain name for your business, but don’t overthink it otherwise you will never get beyond this step.
Once you have chosen a domain name, click on the next button to continue.
Now, you will be asked to provide account information and finalize the plan details. Under package information section, we recommend choosing 36 months plan because that’s the best value.
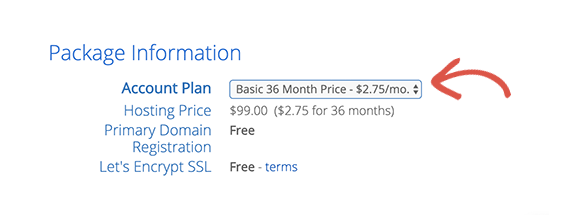
Below that you will see optional extras. We recommend unchecking all of them as they will increase your costs. You can always add them later from your hosting dashboard when needed.

After that, fill your credit card information and click on the submit button to complete the purchase.
Once you have made the payment, Bluehost will send you an email with details to login to your web hosting dashboard. The dashboard is where you’ll manage your website.
Step 2. Setting up WooCommerce and WordPress
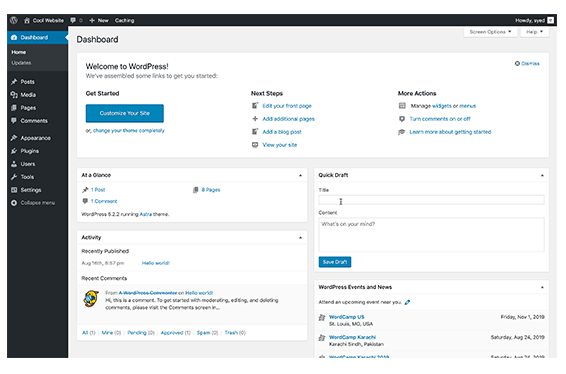
Most web hosting companies also offer 1-click WordPress installation. If you are using any other hosting company, then see our step by step guide on how to install WordPress Bluehost will automatically install WordPress for you when you sign up for a hosting account. You can simply login to your hosting dashboard and click on the ‘Log in to WordPress’ button.
You can always use this shortcut as your WooCommerce login without entering a password.

You will now see the WordPress dashboard.
Now before we install WooCommerce, let’s first set up basic WordPress settings.
Go to Settings

page in the WordPress admin area and change your website’s title and optionally provide a tagline (description).
Bluehost will automatically install SSL certificate for your domain name. Make sure that your website URL is showing https and not http.
If it is showing http, then you need to see our tutorial on how to enable free SSL in WordPress Next, you need to review the website admin email address. This email address is where you will receive WooCommerce notifications and password reset requests so make sure that it is correct.
After that, scroll down a little and select the timezone settings for your website.
Now, you can review all the settings once again and click on the Save changes button to save them.
Once done, you’re now ready to install WooCommerce.
Step 3. How to Properly Install and Setup WooCommerce
WooCommerce is a WordPress plugin, so the installation process is similar to any other WordPress plugin. You can follow our step by step guide on how to install a WordPress plugin Simply visit Plugins » Add New
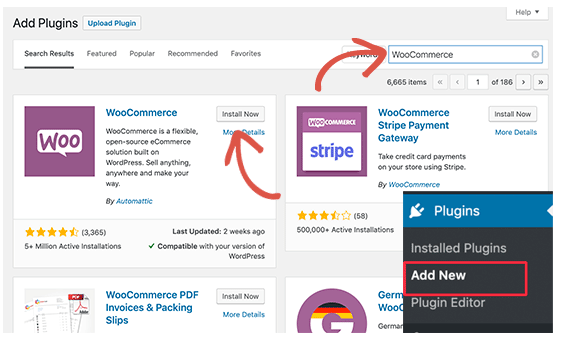
page in your WordPress admin and search for WooCommerce. WordPress will now show plugin search results. You need to click on the ‘Install now’ button next to WooCommerce.
WordPress will now grab the plugin files and install WooCommerce for you. Once finished, you need to click on the ‘Activate’ button to start using it.

After activation, WooCommerce will launch the WooCommerce setup wizard.
First, you will need to select your store location, currency, and what type of products you want to sell.

After that, click on the let’s go button to continue.
In the next step, you will be asked to choose a payment method. By default, WooCommerce supports PayPal and Stripe payment gateways.
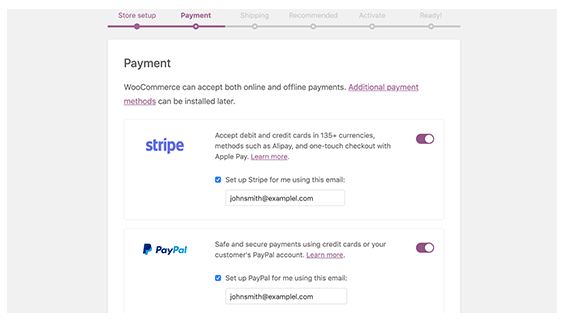
You can click the toggle to enable these payment methods and provide your email address to set them up.
Alternately, you can turn them both off and set them later by visiting the WooCommerce » Settings page and switching to the Payments tab.
Next, you will be asked to set up shipping. You can select free shipping or add flat shipping cost for different zones.
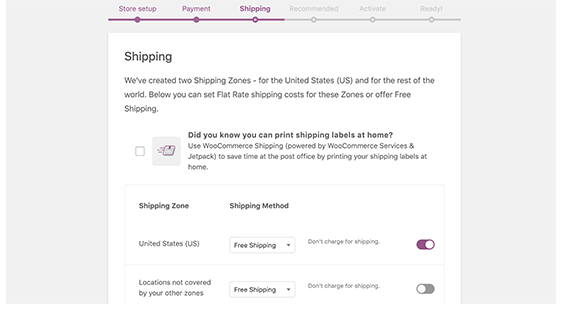
Click on the continue button to move along.
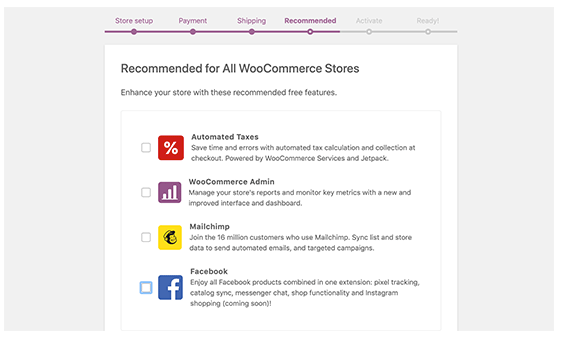
Now you will be asked to install recommended services for WooCommerce. We recommend you to uncheck all of them and install them later when you actually need them.
Next, you will be asked to install the JetPack plugin . You can simply scroll down to the bottom and select Skip this step. There are better and more powerful alternatives that we will discuss later.
WooCommerce setup wizard will now save all your settings, and your store is now ready to start selling.

Step 4. Adding Products in WooCommerce
WooCommerce makes it really easy to add products to your store.
Simply go to Products » Add New
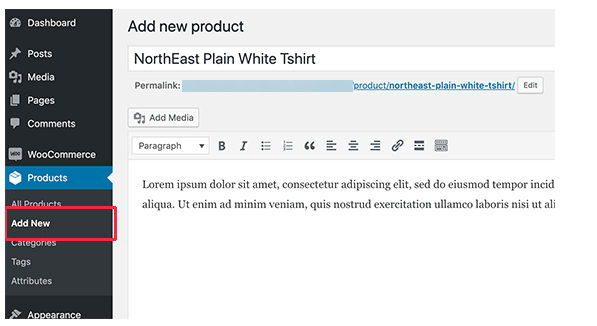
page to add your first product.
First, you need to provide a title for your product and then a detailed description.
After that, click on the ‘Add new product category’ link in the right column. You can create a new category for the product you are adding.

Categories allow your customers to easily browse products on your website.
After that, you need to scroll down a little to the ‘Product Data’ box. This is where you will select the product type, add product pricing, shipping, and other information.
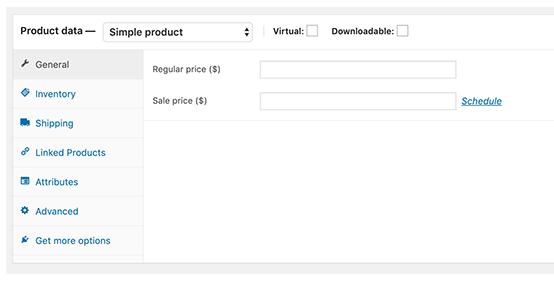
Next, you will see a product short description box. This description will be used on different product pages on your website. You need to add a catchy and informative short description that helps you get more clicks.

Nothing makes a product page more useful than product images. WooCommerce makes it super simple to add product images and even product image galleries to go along with each product.
First, you need to add the main product image. This will be the main product image that’s used on the shop pages across your store.
On the right side, add the Product categories.
You can sell Physical products and variable products .
Here’s an example with a featured image: Adding Products It is essential to learn the basics of WooCommerce and understand what product categories, attributes, and types are: Product category .
For example, if you sell apparel, top wear, bottom wear, and nightwear could be your product categories.

Below that you can add multiple images to create a product image gallery.
Now review all the product information that you have added so far. If everything looks alright, then you are ready to make this product live on your store.
Click on the Publish button at the top right box on the screen to publish your product.

You can now repeat the process to add more products to your website.
Step 5. Choosing a WooCommerce Template & Theme
There are thousands of online stores competing to sell similar products. Choosing a professional design for your store makes a big difference in how customers see your brand.
There are thousands of WooCommerce templates and themes available on the market. While you can use WooCommerce with any WordPress theme, we recommend choosing a WooCommerce-ready theme.
These themes are made specifically for WooCommerce websites, and they will help you make more sales on your website.
Since there are thousands of paid and free WooCommerce themes on the market, this abundance of choices can make it difficult for beginners to choose the perfect design.
To make this easier, we have hand-picked the best WooCommerce ready themes that you can use. All of these are mobile-friendly and highly optimized for SEO and performance.
Astra – One of the top WooCommerce ready WordPress themes on the market. Astra comes with full WooCommerce support, built-in templates for product and shop pages, and dozens of 1-click ready-made websites.
Ocean WP – One of the most easily customizable theme for WooCommerce users.
Shoppe – A modern and highly customizable WooCommerce theme. It comes with its own page builder allowing you to easily create landing pages for your products and campaigns.
Outfitter Pro – A modern, hip, and clean WooCommerce theme made specifically for clothing brands and stores.
Looking for more options? See our expert pick of the best WooCommerce themes for some excellent choices.
What to look for in a WooCommerce theme?
Looking at all these professionally made WooCommerce themes, you may be wondering how to choose the right theme for your business?
Following are just some basic tips that you can use as a guideline.
- Strive for simplicity in design. A simple and clean design helps customers focus on what’s important and improves conversions
- Test your selected theme on mobile. Most users access the internet from mobile devices so make sure that the theme you are choosing looks great on smaller screens.
- Only download themes from WordPress.org themes directory or reliable commercial theme shops . Themes from unreliable sources may have hidden malware which could ruin your business.
- Check reviews and ratings to avoid any red flags
For more tips, see our guide on how to select the perfect WordPress theme for your project.
Once you have chosen a WooCommerce theme, see our guide on how to install a WordPress theme to set it up.
Step 5. Installing WooCommerce Extensions and Add-ons
The real power of WooCommerce comes from powerful extensions and add-ons. These add-ons work exactly like a WordPress plugin, and you can install them like you would install any other WordPress plugin.
There are thousands of plugins available for both WooCommerce and WordPress. You can use them to create contact forms, make landing pages , add pricing tables, gift cards, and more.
Here are our top picks for must-have WooCommerce plugins for any eCommerce store.
WPForms – Allows you to easily create contact forms , customer surveys, customer login forms, and more.
MonsterInsights – Allows you to install Google Analytics and track your top products, categories, and landing pages. See where your customers are coming from and what they do on your website.
TrustPulse – Allows you to utilize the power of social proof and fomo to instantly win customer trust and generate more sales BeaverBuilder – It is the best drag and drop page builder plugin for WooCommerce. It allows you to easily create beautiful landing pages to promote products, marketing campaigns, sale events, and more.
RafflePress – Helps you run viral giveaway campaigns to promote your WooCommerce store.
PushEngage – Helps you connect with visitors after they leave your website through web push notifications For a more comprehensive list, see our expert pick of the best WooCommerce plugins that we recommend.
Step 6. Resources to Grow WooCommerce Store
Now that your WooCommerce store is up and running, it is time to start promoting your WooCommerce store and grow your business.
Here are some resources that will help you learn WooCommerce and grow your online store like an experienced pro.
1. Start an Email List More than 90% of people visiting your WooCommerce store will leave without making a purchase. Losing these users is like losing money.
- This is why building an email list is extremely important for online store owners.
Email list allows you to give customers a chance to stay in touch with you without buying anything. This opens a direct line of communication between you and the customers, so you can then try and convince them to make a purchase.
See our guide on how to properly start an email newsletter for your WooCommerce store for details and step by step instructions.
The good part is that WooCommerce integrates with all major email marketing services in the world including Constant Contact SendinBlue Drip , and thousands more.
2. Generate More Leads Each user who subscribes to your email list is a potential lead / customer. This is why its best practice to offer website visitors multiple options to join your email list. This practice is called lead generation.
Most store owners make the mistake of only adding a basic email signup form to their store which hurts your overall conversion.
-
- This is where
- can help. It is the best lead generation software in the world that allows you to easily convert abandoning website visitors into email subscribers and then paying customers.
For details, take a look at these tips on how to convert WooCommerce visitors into customers 3. Track WooCommerce Users Ecommerce stores need marketing data to make informed decisions. This data includes where your visitors are coming from, which products are popular, which products are not doing so well, and more.
These insights help you make data-driven decisions and adjust your marketing strategy accordingly.
MonsterInsights helps you easily make sense of all this data using Google Analytics. It comes with the enhanced eCommerce tracking which helps you unlock a treasure trove of helpful data with just a few clicks.
For instructions, see our guide on how to track WooCommerce customers in Google Analytics 4. Learn WooCommerce SEO SEO or Search Engine Optimization helps you get more visitors from search engines to your WooCommerce store.
WooCommerce itself is very SEO friendly out of the box, but there is so much more you can do.
Since most beginners find WooCommerce SEO a bit intimidating and technical, we have prepared a complete step by step WooCommerce SEO guide to help you properly utilize SEO without any expert help.
5. Recover Abandoned Cart Sales Once a customer adds a product to their cart, there is 60-80% chance that they will leave it without completing the purchase. That’s an average from all eCommerce websites, so it could be even higher.
Many eCommerce site owners don’t pay attention to this metric from the beginning and that’s pretty much leaving money on the table.
We have compiled a cheatsheet to easily recover WooCommerce abandoned cart sales . This will give you a good head start and will help improve your overall sales.
Hopefully, these resources will help you improve your WooCommerce store and grow your business.
WooCommerce Frequently Asked Questions
WooCommerce is an incredibly powerful platform, and often business owners have many WooCommerce questions before getting started.
Having helped thousands of beginners start with WooCommerce, we have heard a lot of them. Here are some of the most frequently asked WoooCommerce questions from our users.
1. Where can I see a live WooCommerce demo?
WooCommerce is used by millions of websites. Chances are that you have already visited many WooCommerce powered websites without even noticing it.
It is not just used by small businesses, WooCommerce is actually used by some of the world’s top brands as well.
Here are some of our favorite examples of WooCommerce demo in action.
A clean and simple WooComemrce powered store selling classic and premium coffee blends.
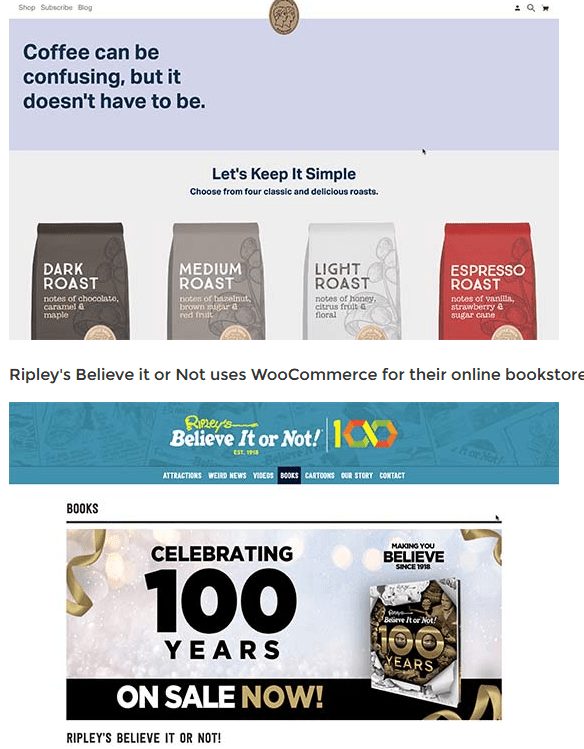
Ripley’s Believe it or Not uses WooCommerce for their online bookstore.

Popular gardening equipment brand Gilmour uses WooCommerce to sell products online. Their website is a balanced combination of functionality and simple design.
Flwr is a small floral design studio based in New Zealand. Their website features a simple and elegant design with a beautiful background and a highly customized shop page.
 2. What Kind of Products I can sell with WooCommerce?
You can sell any kind of products with WooCommerce. Whether they are physical goods (products that require shipping), digital downloads (ebooks, software, digital art), or even subscriptions.
WooCommerce has extensions that allow you to use it as a booking platform, auction site, multi vendor marketplace dropshippping , and so much more.
3. What are some WooCommerce alternatives?
WooCommerce is flexible and easy to use, but it may not always be the right solution. Depending on your needs, you may find some other solutions more suitable. See our list of best WooCommerce alternatives for more examples.
4. Can I use WooCommerce for Dropshipping?
Yes, you can. In fact, WooCommerce is the #1 choice to make a dropshipping website. There are several excellent WooCommerce dropshipping plugins that allow you to easily handle orders, manage vendors, and automate the whole process.
For step by step instructions, see our complete dropshipping guide for beginners
5. Can I add a blog in WooCommerce?
Yes, you can. Your WooCommerce store runs on top of WordPress which is already the best blogging platform in the world. All you need to do is create a separate blog section and start writing posts.
6. Can I change my WooCommerce store name?
You can change your store name by visiting Settings » General page in WordPress admin area. Simply change the title to whatever you want to call your store.
However, if you want to change the domain name of your WooCommerce store, then that’s a slightly different process. See our tutorial on how to move WordPress to a new domain name without losing SEO.
7. Where is my WooCommerce login information?
You don’t have a separate WooCommerce login for admin area because WooCommerce is a WordPress plugin. To login to your WordPress dashboard, simply use the WordPress login link However your customers will have a WooCommerce login, so they can login to their account area to keep track of orders. You can see our step by step guide on how to create custom login forms for WordPress
8. How can I get WooCommerce support?
Since WooCommerce is a free software, there is limited WooCommerce support available through WordPress community forums as well as the official WooCommerce website.
Majority of WooCommerce support is provided by your WooCommerce hosting provider or the individual WooCommerce theme and extension developers.
For custom WooCommerce development and customization work, you can hire a WordPress developer from a trusted directory like Codeable That’s all, we hope this WooCommerce tutorial helped you learn how to set up WooCommerce and make an eCommerce store.